
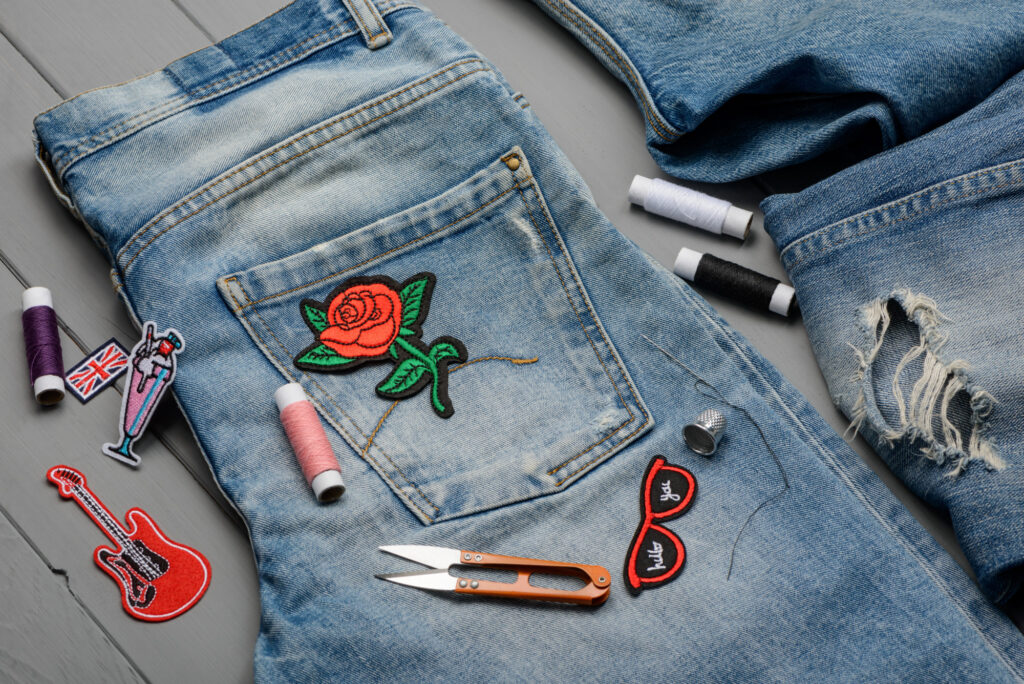
Embroidered patches are a stylish and creative way to spruce up any denim jacket or bag. DIY embroidery is surprisingly simple, allowing you to customize your patch with any design of your choosing. With these customized patches, the only limit is your imagination.
This tutorial will enlighten you on four different ways to create and attach your own handmade patches. When it comes to selecting patterns, their size of them is entirely up to you – smaller designs like fruits or other elements can be quite effective! Don’t worry about following a certain set of rules here; go with what looks best for the look you’re trying to achieve.
There are four distinct approaches to create a patch based on any design, and you can even combine them for a new look. For example, why not try making a felt patch with adhesive backing or a pin featuring different edge stitching? The possibilities for DIY patches are virtually endless – so get creative!
1. Iron-On Patches
Source: viewthevibe.com
Iron-on patches are the perfect solution for a quick, effortless repair job. Not to mention, these make for an ideal gift! All you need is some simple iron-on instructions on how to apply them and you’re all set.
For a successful iron-on patch project, you need these essential items: a pattern of your choice, two pieces of fabric, and two sheets of paper-backed fusible web.
Instructions for Iron-On Patches
- Select a pattern, and mark it onto your fabric with the transfer technique that works best for the material you’re using (the patch in this tutorial was delicately sewn on linen).
- Carefully stitch the design, leaving ample space around its contours.
- To complete the project, cut a second fabric piece to match the size of the first and two pieces of paper-backed fusible webbing.
- Ensure that you adhere to the manufacturer’s directions while fusing a piece of the iron-on web to your fabric. To do so, make sure the paper side is facing up and carefully press down with your iron.
Iron-On Patches ─ Fuse Fabric into the Embroidered Piece
- Carefully peel the backing from the fusible web and then adhere it, with its website down, to the reverse of your embroidered fabric.
- Ironing the non-embroidered part will bind all of the layers together, providing your patch with greater stability and avoiding fraying at the edges.
- To complete the patch, press the second layer of the fusible web onto its reverse side and remove the paper.
Iron-On Patches ─ Cut and Finish Patch
Carefully cut around the embroidered shape, following the contours of its design and leaving a slight margin for extra security.
For extra protection against fraying, consider stitching a line of running stitches near the edge or use a whip stitch around the edge like in this pin patch tutorial. Fusible web also adds an additional layer of security to your patch! And if you are attaching this to something that needs regular washing and ironing, it’s best to wait until after those tasks before adding any sort of stitching for maximum longevity.
When you’re ready to attach your iron-on patch, hold it firmly and then apply the heat from a hot iron coming through all layers of fabric. To get maximum adhesion, ensure that the temperature of your iron is set to its highest setting.
2. Felt Sew-On Patches
Source: feltmagnet.com
This patch style is incredibly effortless since the felt won’t fray like other fabrics, and its secured in place so that your stitching will not wander away. All you need to make a felt patch are the materials for embroidery – felt itself, an indication of where stitches should go, and thread to fasten it with.
Instructions for Felt Sew-on Patches
- If you’re looking to embellish felt, the two best options are either utilizing a water-soluble stabilizer or the tracing paper method. However, make sure that when stitching your pattern onto the fabric, it is spaced out enough for trimming later on.
- Utilize a variety of embroidery techniques to create the pattern you desire. For small patches, satin stitching adds sparkle and shine; however, single-line outlining can also produce beautiful results.
- Once the embroidery is complete, remove any markings. By using tracing paper for this task? Carefully tear away the paper and you’re good to go. If water-soluble stabilizer was used instead, soak it in a bowl of lukewarm water until it dissolves and then lay the felt flat on some towels to dry off.
When soaking embroidery made of wool or a blend with wool fibers, it is essential to utilize cool or room-temperature water – otherwise, you run the risk of shrinking your patch! Utilizing felt material that holds up best will ensure successful results.
Felt Sew-On Patches ─ Cutting
To complete the patch, cut around the embroidery, either roughly following its shape or in a regular form such as a circle or hexagon. The sample displays about ¼ inch of felt exposed so that you have ample room to attach it onto something else; however, if desired, you can trim much closer but be cautious not to slice off stitches and trim too near whereby they may slip away.
Felt Sew-On Patches ─ Finishing and Attaching
To fasten the felt patch, secure it where you want it. Next, use regular embroidery floss to blanket stitch or whip stitch around the edge of the patch—just like with appliqué! As they’re delicate fibers, try not to wash your patched items too often; if necessary, utilize a gentle cycle and protect them in a pillowcase or laundry bag.
3. Self-Adhesive Patches

Source: austintrim.co
For a lasting patch that can be attached with ease, our self-adhesive patches are the perfect solution! All you need is some fabric, a heavy stabilizer, and permanent peel-and-stick adhesive to create them. It’s never been so simple to get your desired look in no time at all.
Instructions for Self-Adhesive Patches
To apply your pattern to any desired fabric, try aligning it along the bias of the cloth. This will help minimize fraying when you’re done stitching. To add stability and ensure a successful outcome, layer a piece of thick stabilizer behind your material before inserting it into the embroidery hoop. When sewing through both layers be sure to use a robust needle as getting through the stabilizer can take extra effort!
Self-Adhesive Patches ─ Cutting and Finishing Edges
After trimming around the embroidered shape, leave a bit of room to stitch its edges. For this type of patch-making process, sharp and geometric shapes work best. Use either a whip stitch or blanket stitch to secure all borders of your finished patch.
Self-Adhesive Patches ─ Attaching Adhesive
Applying patches to your backpack or notebook is a breeze with permanent fabric adhesive. This type of material can be purchased in sheets, rolls, and strips that perfectly fit the patch’s stitched edges. To adhere the patch to any surface you’d like, all you need to do is peel off its self-adhesive backing and press firmly on your item – it’s as easy as that! Remember though: this kind of glue sticks for good, so removing your beautiful patch may prove more difficult than anticipated later down the line.
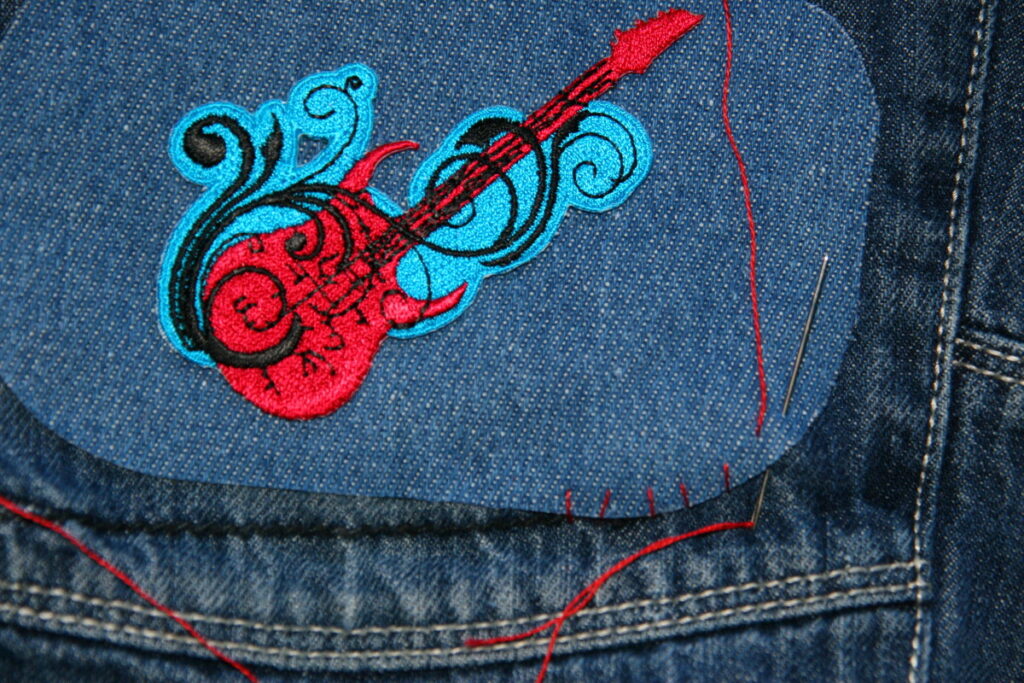
4. Removable Pin Patches

Source: heddels.com
If you need to sport a patch for one-time occasions or want to give the perfect gift, why not make it yourself and turn your fabric into pin patches? All that is needed are embroidery fabric, felt pieces, and bar-style pinbacks. With just these items in hand, you can create beautiful pins with designs of your own choosing.
Instructions for Removable Pin Patches
- Transform your embroidery pattern into the fabric and stitch the design. Using this method, the background of your fabric will provide a beautiful backdrop for the embroidered pieces.
- Carefully snip off the threads around the perimeter of your embroidered piece, leaving a border that is 1/8 to 1/4 inch wide in order for some of its edges to remain visible. Then cut out an identical shape from your felt fabric.
- To assemble the pin, stitch a bar-style backing to the reverse side of your felt piece. It’s important that you keep track of which is the right or wrong side when sewing – this way you can ensure they align perfectly as soon as both pieces are facing each other with their incorrect sides out.
Removable Pin Patches ─ Finishing the Pin Patch
- Securely attach the two layers together and, with three strands of embroidery floss in hand, begin whip stitching around the circumference. Conceal your starting knot between both sides before you come out from behind to get started.
- Carefully stitch from the front to the back, creating tight seams that resemble a glossy satin finish.
- Once you run out of thread, secure it with a knot near the felt, then pass the needle through some stitches on the back side and snip off. Subsequently, begin anew using an analogous technique as before.
Now you can attach your new pin to any article of clothing or accessory and move it whenever you wish.